31 - Shading Engine Graph
Shading Engine Graphby Bonzaj of Plastic
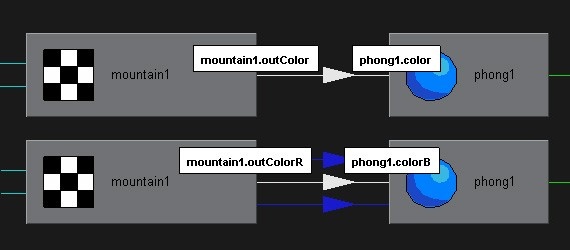
An example showing a vector connection .rgb with .rgb, and a single component connections .grb with .rbg
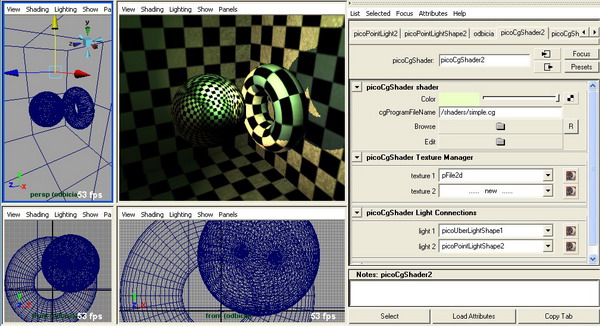
An attribute editor showing part of the shader node, light and texture connections.

The texture selector shows all the possibilities of connecting to texture nodes. Note that cameras, and all nodes capable of rendering to texture are also included in this list.
Lighting shader code in use in different shaders.
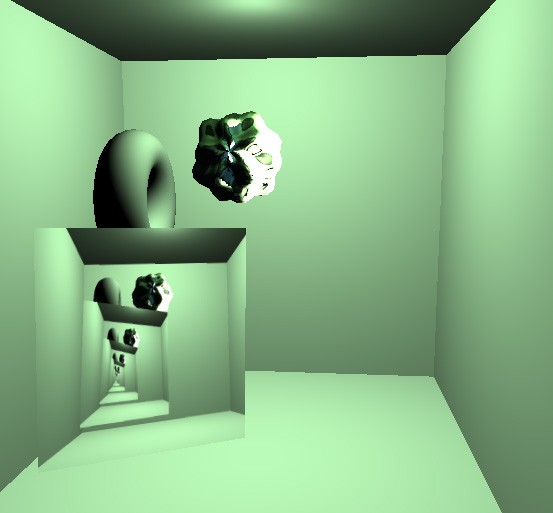
Basic example that shows the capabilities of renderable nodes. The camera is producing a feedback unlimited mirrors effect.
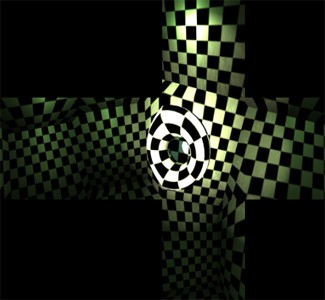
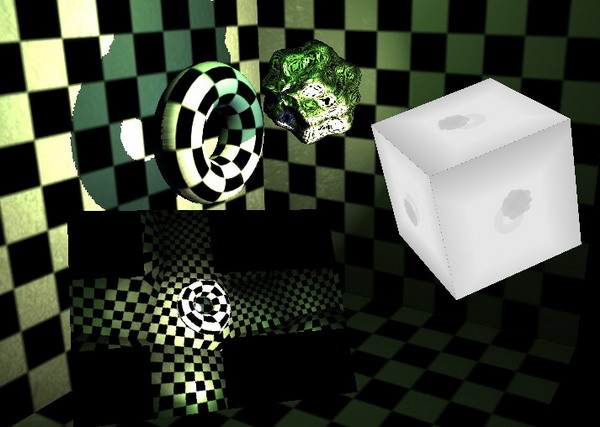
An example showing a blitter in action. The node blits a cube map content on screen overdrawing everything that's behind it.
A scene with over 20 post processing passes that are executed in an user specified order, after different layers of object
Render Layer interface in Maya. On the left render layer editor, and on the right - augmented camera attribute editor
Scene showing three render layers on screen working as a textures for objects

A set of four passes that are performing integration of a texture.
uniform mat4 mvp;
void main(void) {
gl_Position = mvp * gl_Vertex;
gl_FragColor = vec4 ( $ | world | pSphere1.t $ , 1.0 );
Program which is changing the output color value, when a specified attribute in the graph changes.
Introduction
Current graphics hardware becomes faster and offers more features from one generation of GPU's to another. Programmers are now able to build more sophisticated tools for artist, who are used to work in an offline computer graphics environments. Therefore the new realtime tools should resemble the offline ones, to make artists feel more comfortable in learning new techniques.
In the following paper I'll be strongly using Alias Maya interface to show that there is just a little difference between realtime and offline shading graphs. Moreover artists are used to use Maya standard material interface, which has been developed over the years and became one of the standards in computer graphics industry.
Shading graph
The most obvious way of developing a material by artists is by using some kind of prepared blocks that communicate with each other, thus forming a graph. The blocks from now on will be called nodes, and their communication channels called attributes.
We can think of a node like of a set of functions. Every function has arbitrary number of input attributes and one output attribute. Having couple of such functions that share their input attributes, and they can connect their outputs to inputs etc, we can form a node.
As for the attributes, there are many types of attributes that are used in the graph. But for shading purposes we can simplify their types. So there are couple of major types of output attributes. A single component output (of type int or float), a four component vector output (of type int or float). Additionally for optimisation purposes we can add a 3 component vector output. The last attribute type that will be used in shading engine is 4x4 matrix.
DAG graph
The artists are free to connect nodes with each other. The only exception is that they can't make cycles in the graph. The cycles could make an infinite loops of evaluation which is a problem. I've decided to use a DAG graph not only because it is acyclic. The second reason is because Maya is using DAG as it's main graph. So first of all to make a shader I'll have to choose a subgraph from Maya's DAG. Maya will prevent from making cycles. It will also throw out errors. Searching for a shading subgraph is relatively easy. You start from a shading node and traverse all it's connections.
Swizzle
Swizzle is a feature that graphics hardware handles pretty well. There's nothing new about except that It should be supported as easy as we could. As I've mentioned above the nodes can be connected to each other using component attributes. These component attributes (sometimes called compounds) have their single component children attributes. It's easy to disconnect vector components and preserve the connection by connecting their children in arbitrary way. Therefore the programmers only task will be in handling the connection order and passing it as a swizzle to a shader.
In points and Out points: Using graph attributes directly in the shader
Having the "In points and Out points" functionality it's easy to evaluate the main shader attributes. But sometimes there's is a need for a quick change directly in the shader code to add a special effect. In example we want to change a diffuse color component of a sphere while it is moving. Augmenting a shader language by adding our own expressions is a reasonable solution. Here's an example program written in GLSL (a vertex shader) that solves the above problem:
In this case the $ character is used to identify graph attributes. The unique path to the attribute in $ brackets resolves the direct connection of shading language with the graph.
GUI
From the beginning of this article I was helping myself with a Maya interface, sometimes writing that this interface was tested with success over the years. So the "only" programmer's task is to rewrite the maya graph or to interpret it to his native data structures. The hypergraph editor from maya seems to handle all the problems concerning connection of nodes, while the attribute editor resolves all the issues of setting the attributes values.
Knowing that artists likes the tools that are as easy as they could I augmented the attribute editor so it could handle the hypergraph work of node connections. Although the hypergraph can work with arbitrary connections I've assumed that the artists will work with already travelled paths ie. connecting textures to color attributes or color output of shaderBlock nodes to texture coordinates of a texture node. The idea is to resolve the probability of using a node with other node. Let's examine the solution.
Lights
Lights are one of the most important parts of the graph. They should give the ability to model the scene in arbitrary way. Currently I've limited the number of light sources to four per element, but there are no problems with increasing this limit. I've just encountered that this amount is enough for all scenes that I've produced. The best results were obtained when using a combination of uberlight, a spherical harmonics lighting environment with a mixture of directional light source for outdoor scenes.
Light interface
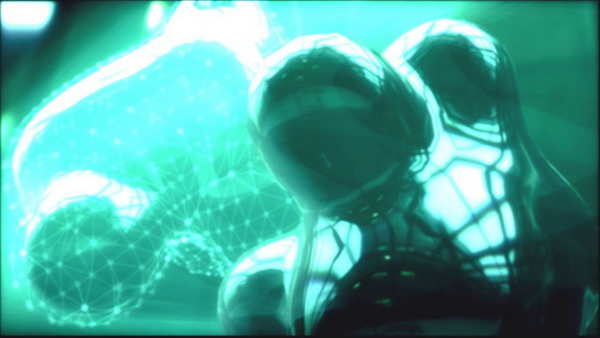
Light interface should be as much abstract as it can, but it should also provide a functionality to handle totally different light sources. In example typical point light needs one interpolator vector in a vertex shader while uberlight needs two of them. So like other modules in the shader graph lights are also treated in the same way. The interface includes functions that are used for querying the number of needed interpolators, and also handling them properly. The included example shows a scene that is lit by two light sources - a point light and an uberlight, that projects cookie texture and does shadowmapping. When using spherical harmonics infinite sphere light source, the model that is being lit should provide SH coefficients for proper working. Lights are a special case in a shader graph because, they must be prepared to work with any abstract shader. The following image shows the same lighting shader code attached to absolutely different shaders.
Texture processing
Textures are a very important in nowadays realtime graphics. That's why a special care must be taken to handle the textures with an abstract touch. I'll present a a special section of the shading graph, that is responsible for texture processing. This part of the engine is made of couple of nodes that are prepared to work efficiently with textures. I'll ignore all the typical texture nodes like file texture nodes or generated textures, because they are less important than other modules which work as a core of texture processor.
Renderable nodes
Every node in a graph can be renderable. It means that this node has an output texture and for calculating it, a special render function is called. There is a major difference between a renderable nodes and blitters (section ref{blitters}). Renderable nodes can render only once per frame. It is not said that renderable nodes must render the whole graph. They can even render some kind of abstract data stored directly in renderable node. But the most popular renderable nodes, renders the graph. The typical example is a camera. The other most popular renderable nodes are cubeMap renderers, that capture the light for HDRI spherical harmonics light sources or simple uberlights, that renders the graph to produce shadow maps.
Blitters
Blitters are very important nodes. Although they're not renderable, they are also capable of rendering to textures. Their main purpose is to copy one texture to another to provide a functionality similar to double buffering. Their second task is to blit the copied texture on screen whenever asked (many times per frame). As we will see in the upcoming paragraph texture blitters are the root nodes for all post processing and texture processing nodes. The ability of rendering couple of times per frame is obvious. Post processing can be added several times per frame, after each object. This is useful for producing effects like fake depth of field, or layered convolutions. Blitters can also work well for debugging purposes - displaying the arbitrary texture (including 1D,cube, 3D (with extra options)) on screen.
Texture Processor
A basic texture processor node is a derivative of blitter. The main difference is that it has many inputs, and more sophisticated shader. Of course everything what was described in previous sections works with texture processor shader. The new feature is variable number of Out points. It's because texture processors have variable number of input textures and there are different expressions (chosen by artists) between input textures.
Post Processing
Post processing is another derivative of a blitter node. Another difference between them and also texture processor node is an ability to produce the output in several passes. Artists produce a stack of previously written post processing effects (ie. horizontal and vertical blur, image size multiplier, compositing etc.). Because post processing node has an attached texture so in special case we don't need to blit result of post processing on screen but into this texture. This will enable us a new package of effects like blurred reflections.
Render Layers (multipass shaders)
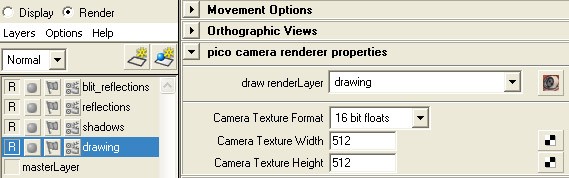
With the entrance of ATI Radeon X cards, ATI presented a paper, where was a brainstorm about handling efficiently multipass shaders without doing any hardcode. They used LUA back then, which was a solution but it required a programmer The engine still needs a way to separate the whole graph into subgraphs, attach subgraphs to renderable nodes and be capto work with an artist and helping him to resolve problems with multipass processing. Renderable nodes presented in previous chapter are capable to render to any rendertarget type, including depth maps, cube maps and floating point textures. The render target is specified directly in the GUI. Whilst different renderable nodes enable render targets, this is solution is still not complete. able of handle different shading networks for those subgraphs. Maya's build in render layers seems to almost solve this problem. The only problem is that cameras and all renderable nodes can't be instructed to render directly to one specified render layer. This can be solved by augmenting Maya camera nodes.
Attaching renderable nodes to render layers
Render layer can be instructed to render only specified parts of the scene graph. They're used in offline processing to render one object with different shaders, and then composite it in an external program. I'm using them to separate the scene into subworlds (ie. shadow or reflection subworld, that are made of less complicated objects with different shaders). Each camera can be instructed to render only specified render layer. We can attach uberLight node to shadow render layer, so it will render only objects that casts shadow.
Working with blitters
The engine should enable the tools for passing the result form one render pass to another. Blitters work very well in situations where's a need to pass the whole copied buffer. This situations occur when rendered object is textured with texture of currently active camera. Blitters can also convert between texture formats ie. flatting the floating point buffer to fixed point or rendering a cube map as a cross on 2D texture.
More complicated multipass shaders
As an example of more complicated shader. I'll present an integration shader in four passes. This technique is used to precompute PRT on a GPU. The example is built from four render layers, each with a quad with a different shader. All shaders require an input texture that is fetched from the last pass.
Debugging and profiling
Debugging and profiling aspect is very important, and so the shading engine must provide the appropriate tools.
Debugging
When the graph is growing and a bug appears, sometimes it is useful to disable some kind of its parts but without using disconnection tool. So the engine should support a special state set, that control the flow. Because Maya already has such functionality, we can adopt it. The node runs in three different states - normal, hasNoEffect and blocking. Blocking is used to cut the rendering of the node, while hasNoEffect temporarily disables the core "compute" function inside a node. Then the output from a node is based on a last value before switching the node's state.
As I've mentioned above the good debugging tools for shaders and render targets are blitters, that are capable of drawing the content of render targets on screen. The last tool that I often used to check values of attributes are simple shaders that draw directly attribute contents as a color.
Profiling
The tools that I've presented in previous subsection can also be used for profiling purposes. Disabling parts of the graph can help the user in locating the bottlenecks. Also there is possibility to change the resolutions and texture format of any render target at runtime.
Comments